Friday, 29 June 2012

Microsoft Is Going To Launch A New Stylish Tablet Of 10.5 Inches

Microsoft Is Going To Launch A New Stylish  Tablet Of 10.5 Inches


Microsoft New Surface Tablet

Microsoft New Surface Tablet


Microsoft is going to launch a new and latest designed tablet of 10.5 inches with a keyboard having touch cover. Microsoft new tablet is good in software as well  as in hardware. It has quite decent style and look. I have taken some information from Microsoft official website which stated that: 


ADVANCES IN INDUSTRIAL DESIGN


Conceived, designed and engineered entirely by Microsoft employees, and building on the company’s 30-year history manufacturing hardware, Surface represents a unique vision for the seamless expression of entertainment and creativity. Extensive investment in industrial design and real user experience includes the following highlights:


Software takes center stage: Surface sports a full-sized USB port and a 16:9 aspect ratio – the industry standard for HD. It has edges angled at 22 degrees, a natural position for the PC at rest or in active use, letting the hardware fade into the background and the software stand out.


VaporMg: 

The casing of Surface is created using a unique approach called VaporMg (pronounced Vapor-Mag), a combination of material selection and process to mold metal and deposit particles that creates a finish akin to a luxury watch. Starting with magnesium, parts can be molded as thin as .65 mm, thinner than the typical credit card, to create a product that is thin, light and rigid/strong.


Integrated Kickstand: 

The unique VaporMg approach also enables a built-in kickstand that lets you transition Surface from active use to passive consumption – watching a movie or even using the HD front- or rear-facing video cameras. The kickstand is there when needed, and disappears when not in use, with no extra weight or thickness.


Touch Cover: 

The 3 mm Touch Cover represents a step forward in human-computer interface. Using a unique pressure-sensitive technology, Touch Cover senses keystrokes as gestures, enabling you to touch type significantly faster than with an on-screen keyboard. It will be available in a selection of vibrant colors. Touch Cover clicks into Surface via a built-in magnetic connector, forming a natural spine like you find on a book, and works as a protective cover. You can also click in a 5 mm-thin Type Cover that adds moving keys for a more traditional typing feel.


An Amazing Windows Experience


Two models of Surface will be available: one running an ARM processor featuring WindowsRT, and one with a third-generation Intel Core processor featuring Windows 8 Pro. From the fast and fluid interface, to the ease of connecting you to the people, information and apps that users care about most, Surface will be a premium way to experience all thatWindows has to offer. Surface for Windows RT will release with the general availability ofWindows 8, and the Windows 8 Pro model will be available about 90 days later. Both will be sold in the Microsoft Store locations in the U.S. and available through select online Microsoft Stores.


Contributing to an Expanded Ecosystem


One of the strengths of Windows is its extensive ecosystem of software and hardware partners, delivering selection and choice that makes a customer’s Windows experience uniquely their own. This continues with Surface. Microsoft is delivering a unique contribution to an already strong and growing ecosystem of functional and stylish devices delivered by original equipment manufacturers (OEMs) to bring the experience of Windows to consumers and businesses around the globe.


Additional Product Information


Surface for Windows RT


● OS: Windows RT● Light(1): 676 g● Thin(2): 9.3 mm● Clear: 10.6″ ClearType HD Display● Energized: 31.5 W-h● Connected: microSD, USB 2.0, Micro HD Video, 2×2 MIMO antennae● Productive: Office ’15′ Apps, Touch Cover, Type Cover● Practical: VaporMg Case & Stand● Configurable: 32 GB, 64 GB.Surface for Windows 8 Pro● OS: Windows 8 Pro● Light(1): 903 g● Thin(2): 13.5 mm● Clear: 10.6″ ClearType Full HD Display● Energized: 42 W-h● Connected: microSDXC, USB 3.0, Mini DisplayPort Video, 2×2 MIMO antennae● Productive: Touch Cover, Type Cover, Pen with Palm Block● Practical: VaporMg Case & Stand● Configurable: 64 GB, 128 GB


Suggested retail pricing will be announced closer to availability and is expected to be competitive with a comparable ARM tablet or Intel Ultrabook-class PC. OEMs will have cost and feature parity on Windows 8 and Windows RT.


Songza Launched Streaming Music On iPad

Songza Launched Streaming Music on iPad


Last week, streaming service launched a new Ipad app, It is the most successfull  app during the time being, From apple itunes store it has been downloaded 1.15 millions time in only ten daysThis is a testament to how startups can disrupt crowded spaces as long as the core idea is solving the problem differently. Songza achieves that with some added user delight to boot.


Songza For iPad


unlike Pandora’s algorithms or Spotify’s blank canvas approach, Songza offers up playlists that have been curated by music experts, like Rolling Stone writers and DJs. But the way these playlists are delivered is what really makes the app special (and likely abutting threatening to the other companies in the space). 


Songza has a feature called Concierge, wherein the app takes bits of information, like your preferences, the day and time, and the fact that you’re on a mobile device, and gives you a list of activities common for that specific moment in time.


So, on a Friday late at night, Songza will give options for a sweaty dance party or getting high, with filters for each like Pop and Hip Hop. Users can then choose from playlists that fit under that umbrella.


On the other hand, you’ll see activities like getting up and working out on a Monday morning like this one. There’s also an Explore feature which lets you select your playlist by Activity, Genre, or Mood.


Songza


Songza hasn’t shared numbers from before the release of the iPad app, but founder Elias Roman did say that before this week, the web was their most trafficked platform. But that’s all changed with the release of the  iPad app, which is only good news as Roman sees Songza as a mobile-first product.


Hope you liked the article please send us feed back in commentsThank you

G-Parted Usage Tutorial

G-Parted Usage Tutorial 

Alright i know this isnt specifically a Microsoft Windows Related software. But this is the best place for it as it does the job of formatting far better than anything on Vista or Win7′s install DVD. This software is on par with the full format available on XP’s setup CD.


G-Parted 1


 Now the reason for this is simple. The format used on Vista/Win7 setup DVD is only a quick format and it is junk. It is like sending your data to the recycle bin and not clearing it out of there. So when you go to install again, you can easily still have issues. Using GParted is much faster and far better than a quick format and it is done in about the same amount of time. 


Step 1:

To start go to the page and download the latest ISO of the program. From there use ImgBurn, or any other program that can burn ISO’s directly, to burn the ISO to a CD. Do not extract the ISO as this will not allow the CD to be bootable. Which is the most important aspect of the software.


After that restart your PC with the newly created GParted Live CD in the tray. Upon a restart the software should start up automatically. If it does not and goes directly to Windows you need to check your BIOS boot configuration to make sure that it is set to boot from your Optical Drive first before your hard drive. Each BIOS is different and varies on how this is done so check the manufacturer’s website for specific instructions on this.


G-Parted 2


After you get the boot menu, you should select the Default Mode. If that doesn’t work try one of the older Modes till you find the mode that works for you. Not every system is the same so the Default settings might not work for you.


After that you will see a bunch of words scrolling in regards to what is loading. You should be prompted to select your keyboard layout and language. Hitting Enter should select USA and English respectively. The program should list the others for you if you choose not to use this setup. 


Step 2:

After that the Main Screen comes up.


G-Parted 3


In the upper right hand corner is a drop down menu to select the different hard drives you have installed. This is for physical hard drives installed. Not for partitions on a hard drive! So if you only have a single hard drive installed, this option should be greyed out for you. So if you are not trying to mess with the hard drive selected, use the drop down menu to select the proper drive. 


G-Parted 4


If it is on the drive you want, you will see that it lists the partitions on the drive. Again still going off of the very first image. It shows you how the drive is split up and it shows different colors for different formats. Green is usually NTFS, Blue for EXT2 and so on. 


G-Parted 5


Upper image shows you all the different colors for each type of partition. It can do everything from FAT32 to HFS+. So this program can be used by Linux users as well as Windows users and OS X users. 


Step 3:

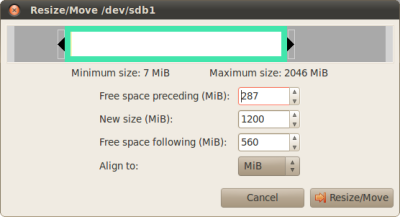
Now to bring up the menu that you see for the drives option in the  screen shot above, is just a simple right click on the partition. Just right click on the box at the top. Now here you can do what you want.If you wish to delete that partition just right click, select delete. This will then show the drive as RAW partition. But note at this point the changes have not been made!To create a partition in RAW space just right click and select Create. Here you will see what is shown .


G-Parted 6


The Space Preceding and Space Following aspect is something you need to know about. This allows you to easily create space before or after the partition you are creating at this time. So if you are trying to make multiple partitions just make sure to use the appropriate selection for preceding or following to create space there. Remember that real hard drive space is done in allocations of 1024MB. So if you are trying to create a partition 4GB is size it will be 4096Mb not 4000MB. Easy way to figure this out, just use a calculator and multiple 1024 by the amount of GB you wish to create. In my example 4GB is = to 1024 X 4.


Now this will create the partition. It will still be in RAW format at this point. You have to right click on the newly created partition and select the option Format To, 


G-Parted 7


For Windows you should be using NTFS. It is far superior and far more secure than FAT32. FAT32 is used for systems like OS X that want to dual boot with Windows but still be able to access the data in both Operating Systems. I would suggest to find alternative methods to use NTFS and HFS+ in the opposite OS’s though. OS X has software available to read NTFS and there is some software out there to access OS X’s HFS+ partitions.


For Linux users, if you are a first timer EXT2 is the best bet as it is, as far as i know, the most widely used and supported format by all Linux distributions. but read more about what format the distribution you are going to use can support as you may wish to use a different format. 


Step 4:

Now after you have created all of your partitions and got everything setup the way you want, you have to remember to click the Apply button.


This is where you will see screen shots.


G-Parted 8


G-Parted 9


After is says Done is the process fully complete.


Conclusion:


Now some people will ask about the Manage Flags aspect. This is only used if you are removing a OS from a multi boot system. Like removing Vista from your Vista/Win7 setup. It is only used in certain cases where after removing the OS you find that you cant boot. So this aspect of the software should be avoided unless you are advised to use it for a specific problem with your boot. At install of your OS of choice it should set up the flags accordingly.


After Thoughts:


I hope that this helps people with the use of Gparted. It is a far superior tool forformatting. Yes it is a Linux based program, but can be used for all systems. If you have a question, comment or wish to add something, please make sure to post. Thank you for reading this long thread.


Admin Rights In Vista/Win7

Admin Rights In Vista/Win7

Alright time to get this over with once and for all. Here is the clarification on how to get Admin rights.

*Note*

These are not steps that should be taken to keep your PC fully protected. They are just measure to stop UAC prompts. In no way shape or form am I saying that this should be done. This is a do at your own risk suggestion. UAC is there for protection. Disabling it can adversely affect your system and these suggestions are not endorsed by me, Microsoft or Tech-Forums in any way.

I said that cause i have to. People might get the wrong idea and think that this is a good thing. It is not. It is just how to work with UAC if you think it is over bearing. These steps can allow drive by downloads to happen and your system get infected.


Now this is USE AT YOUR OWN RISK


There is NO need for full admin rights at all times. No matter who you are. I am a power user and a Beta Tester and I dont need full rights all the time. So there is no way that people can say that they need full rights every seconds of every day. It isnt true. You can get by with UAC and the rights you have. This is just to help people understand what all this is.Okay now when you install Vista orWindows 7 you will see that your accountis marked as Administrator. But then you get prompted to give Administrator rights to certain tasks. So you are saying to yourself “Why is that? I am the Admin and only user of this PC?”Let me clarify this.You are a Admin of the PC. But you are a limited Admin. There is still a Hidden Administrator account which has full elevation and full powers. While your account does not. Which is why it is prompted for UAC rights to elevate. Many times you will hear me reference this account as a Power User account with Admin Rights. Cause that is basically what it is.This was added to Vista and Windows 7 cause of how easy it was for hackers, spyware and virus makers to gain access to a PC cause the Administrator was live and active when you accessed Safe Mode. Now the Full Admin account is Disabled. So even if you do boot to Safe Mode you still will NOT see it as a account that you can log into.Now these steps provided will help you work with UAC. Even i have UAC on. So it isnt that bad.The first step is to enabled the Hidden Admin account.This can be done a couple of ways. The first is the method i use with Busienss, Ultimate or Enterprise Editions of Vista/Win7.

First Method: Secpol.msc 

In the start menu search for secpol.msc:

Secpol


Now enter that screen. Here you will see this:

Secpol 2


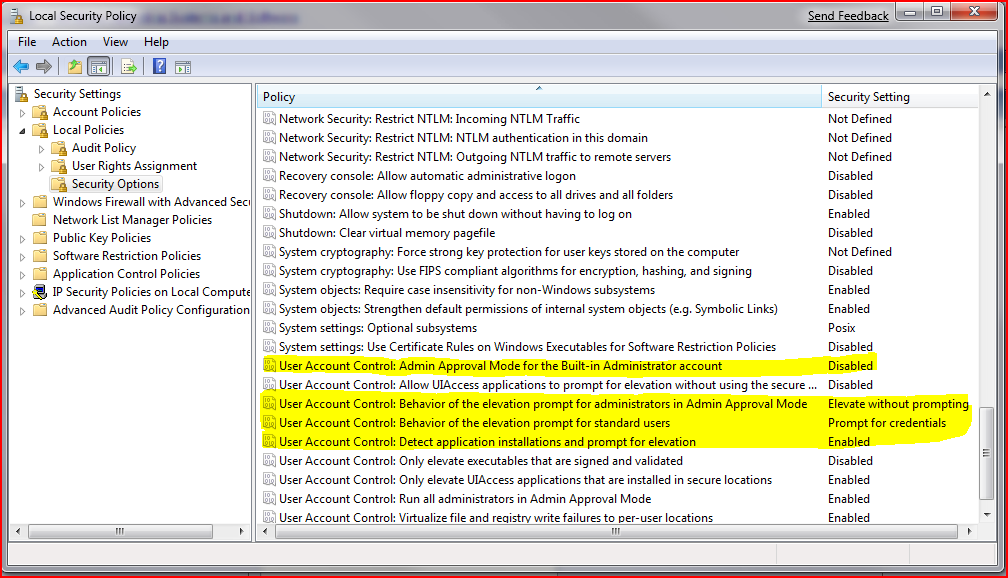
Now go under Local Policies>Security Options. there you see this:

Secpol 3


I have already highlighted in Yellow the option you need to change. As you see my account is already active. But it is not in use. I needed it at this time for something else.


Alternative Options:

There is also more options toward the bottom.

Secpol 4


Now you see i have 4 items highlighted here.

Option 1The first is to keep the UAC PRompts from happening in the Admin account.


Option 2The 2nd one is the most useful one. That is the one to use with your account you currently have. That one will Elevate a program without asking for rights every time.


Option 3The 3rd option should NEVER, EVER, EVER be changed. End of story.


Option 4The 4th option is same as above. DO NOT DISABLE this option. If you do it is on you. I have not suggested it and will not. Furthermore i will not even explain what it does. Cause it should NEVER be disabled.


I think i got my point across with those settings. Now many of you are sitting there saying to yourself “But Mak you suggested that i get Home Premium which this doesnt apply to!”Correct. There is another method that works no matter what version you are using.

Method 2: Using The Command

First click Start. There type CMD into the search bar. Right click on it and select Run as Admin. 

cmd


Now in there you will type in this:


Code:

"net user administrator /active:yes"


This will enable the Admin account. So when you logoff you will see the Admin account listed as accounts that you can log into. There is no password set by default. So you dont have to worry about typing in a password. Just click the account and go.Now if you wish to disable the account it can be done as well.


Code:

"net user administrator /active:no"

That will disable the account.


Using Vista Home Basic/Home Premium:

Step 1:

Click Start, and type “cmd” in the search area, right click on “Command Prompt” and select ‘Run as Administrator”.

Step 2:

In the command prompt type “net users Administrator /active’” (Note the capital “A” in Administrator) and press Enter, you will get a confirmation as “The command completed successfully”.

Step 3:

Click Start, and type “regedit” in the search area and click Enter, navigate to: 

"[HKEY_LOCAL_MACHINE\SOFTWARE\Microsoft\Windows\Curr entVersion\Policies\System]"


Double click on “FilterAdministratorToken” and set it to “0″Information taken right from the Vista Discussion page where i had it posted before.


Now with all of that said i will say this now.

Additional Information:

This is a NEW ACCOUNT. So if you already have your desktop setup to your liking and everything working accessing this account and using it all your work will be LOST. You will have to redo your personalizations for this account.

*NOTE*

These are not steps that should be taken to keep your PC fully protected. They are just measure to stop UAC prompts. In no way shape or form am I saying that this should be done. This is a do at your own risk suggestion. UAC is there for protection. Disabling it can adversely affect your system and these suggestions are not endorsed by me, Microsoft or Tech-Forums in any way.

I said that cause i have to. People might get the wrong idea and think that this is a good thing. It is not. It is just how to work with UAC if you think it is over bearing. These steps can allow drive by downloads to happen and your system get infected.


How To Take Owner Ship Of Files In Vista/Win7

How To Take Owner Ship Of Files In Vista/Win7

Alright since it seems that so many people have questions about how to do this i will give you a nice complete guide on how to take ownership of a file in Vista. First you have to select the file you want to take ownership of. From there right click and select properties. You get this screen:

My Document Properties


From here select the security tab. The screen will look 

like this:

My Document Properties


Click the Advanced button. It will bring this screen up:

My Document Properties (ADVANCE BUTTON)


Now click the Owner Tab. The screen will look like this:


My Document Properties (OWNER TAB)


From here you click Edit to get this screen:


If you want to take ownership of all files and folders in the subfolder of the main folder, say if you are taking control of a folder from XP like My Documents and you do not want to have to do it for each folder, check the box that says “Replace owner on sub-containers and objects.” This will allow you to take ownership of all files and folders at once.Now you select the User Account you want to give the permission to. Then click Apply. A message will pop up telling you that if you have just taken ownership you have to close and reopen the objects properties before you can view or change properties again. Click okay and get back to the Computer screen. You should now have full authority to do what you wish with that file. I hope this helps.


How To Do It Using Cmd Prompt:

This is just a simple command to take the ownership of a file in Windows Vista.

1. Open Start menu and enter cmd in the Search box.

2. Navigate to your file’s directory in the command prompt. ( e. C:\Files\myfile.exe)

Then type in the following command:
code:

takeown /f myfile.exe

You should get a success message once this is completed.SUCCESS: The file (or folder): “C:\Filesz\myfile.exe” now owned by user “ComputerName\username”  where ComputerName = Your Computer’s Name username = Your user name 3. That will give you ownership of the file, but you still have no rights to delete it. Now you can run the cacls command to give yourself full control rights to the file:Code: cacls myfile.exe /G username:FYou need to substitute your user name in place of username .Notes:To take ownership of a folder and all its content, you can add the /r switch for recursive execution: Code: takeown /f . /rYou can also use the /a switch to make the ownership go to the Administrators group instead of the current user: Code: takeown /f intlcfg.exe /a